Do you love to dip your nails in bold colors? Of course, a bright red or deep pink only really comes into its own on perfectly manicured hands. But you don't have to run to the nail salon or beautician for that. The solution: do your own manicure! A mani like a professional also works at home. We'll give you the best tips on doing a manicure yourself and show you step by step guide what you have to pay attention to when doing a manicure yourself. We'll also tell you how to best shape your nails and which tricks you can use to make the polish last a long time - and how to dry the nail polish faster can leave. We also have a few tips on what to look out for during a manicure in the nail salon and how you can do something for your hands overnight with the right care. Here is the best guide to a perfect manicure in ten steps! Plus: paint the nails with the left hand - that's perfect!
Step 1: hand bath
So that the cuticle becomes soft and can be loosened more easily, you bathe your fingers in warm water with a little foam bath, shower gel or washing-up liquid. 1 minute for normal nails, 30 seconds for soft nails.
Step 2: Apply cuticle cream or nail oil
Then you put a small amount of cuticle cream and / or nail oil on the cuticle and massage it in well.
Step 3: push back / remove cuticle
Then carefully push back the cuticle with an orange wooden stick. This is also very good for removing nail polish residues. For me it is the case that there are sometimes small residues from the base coat on the side of the nail bed. This has been softened a little by the hand bath and can be "scraped off" with a stick.
Step 4: file nails
Now it's time to file. You first file the side and take the width of the nail (if necessary) so that it does not become wider at the top than the nail bed. Then carefully file the nails in one direction, preferably from the side to the middle. Jessica even has different files for different nail textures. We probably all know that you shouldn't “saw” when filing. Petra explained to us that it is really important for the health of your nails that you take this to heart. Then the fingers come into the nail bath again to wash off any dust or cuticle residues.
Step 5: dry hands properly
By the way, there is a method how you can dry your hands "cuticle-friendly". One wraps a finger lightly with the towel and wipes back towards the nail bed. This means that the cuticle is always pushed back a little and it can never grow over the nail. This method can be used a couple of times a week after washing your hands.
Step 6: remove cuticle on the side

If necessary, cuticles protruding from the side can now be cut off with cuticle nippers. For me it is sometimes the case that small corners stick out from the skin on the side of the nail bed. It's not bad, and it doesn't hurt either, but it looks nicer when it's gone. Incidentally, I was always afraid of such cuticle nippers and would never have dared to cut anything off. Petra then showed me and explained to me that nothing can happen if you are careful. I got one of these cuticle nippers for myself at home and I have to say that it is really no drama to cut away the flakes of skin with it. The pliers are available from dm or Müller. Mine got me from a dear friend who is a beautician from a specialist store.
Step 7: apply the basecoat

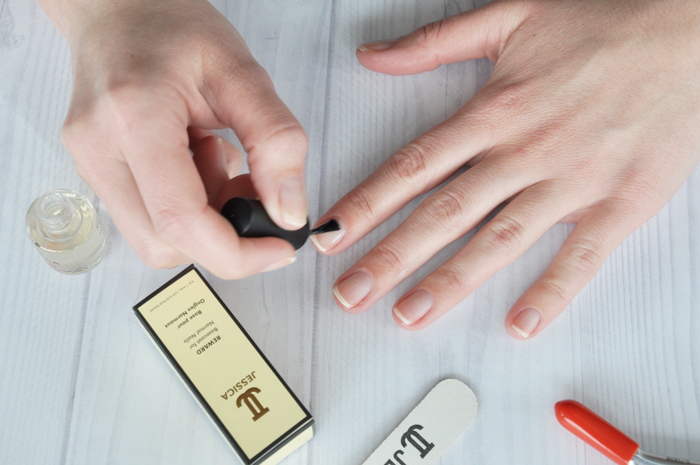
For my nails, Petra chose the “Reward” basecoat, which is mainly intended for normal nails. To apply it correctly, put your hand up and pull the fingertip of the nail down a little with your thumb. So you can also apply the basecoat to the edge of the nail. You do this with all the nail edges of all nails. Then apply a layer of basecoat to the nail surface.
Step 8: apply color varnish:
Here you proceed in the same way as with the basecoat. First come the nail edges. This is followed by a layer of colored varnish on the nail surface and then a second layer. If you mess up a bit, that's not a problem. Because here too, Petra showed us a way of quickly repairing such blots.
Step 9: remove blunders
To do this, simply pull apart a cotton ball and wrap a little cotton wool around an orange wooden stick. Dip sticks in nail polish remover and carefully remove the blemishes. Of course you can also use a nail polish remover pen for this. However, this has the disadvantage that the tip of the pen quickly takes on the color of the nail polish that has been removed. For example, if you have corrected dark paint, you can no longer use the same point for light paint, because the paint that is already on the tip often rubs off. This swab and cotton swab method saves you the money for a remover pen and it is also very easy.
Step 10: apply topcoat
When the polish has had a few minutes to dry, a layer of topcoat is applied over the nails. I used the "Brilliance - High Gloss in a Flash".
Step 11: apply Quick Dry drops

Last but not least, there is a drop of “Quick Dry 60-Seconds Drying” on every nail. It is helpful to let the drop fall on the nail at an angle so that the liquid can run over the whole nail. Then you have to be patient and wait until the paint is completely dry. Even though we actually had 5 layers of products on our nails, they dried surprisingly quickly. I think these Quick Dry drops are really good and dry the layers through quickly. Yesterday I also dripped it over an Essie varnish and the varnish was dry within about 10 minutes.
Tips to make the manicure last a long time:
So that you can enjoy the paint for a long time, Petra also gave us a few tips on the way. You should apply another layer of topcoat the next day and massage in nail care oil regularly (preferably in the evening before going to bed). In addition, you can apply a layer of colored varnish (also on the edge of the nail) and a topcoat after approx. This refreshes the color a bit and prevents tipwear.
By the way, I didn't do that because I wanted to see how long the nail polish would last. The next day I unfortunately knocked out a minimal corner of paint because I came to the edge of a drawer. But apart from that, the paint lasted 5 days without chipping. Then you saw tipwear, but nothing chipped off. Only after the 6th day did very small splinters break off the edge of the nail and it was time to paint off. This durability is definitely sufficient for me personally, as the nails grow back in the meantime and I don't think it's so nice when you already have 1 mm margin between cuticle and varnish.
My conclusion:
By and large, I learned a lot that day. Above all, it was important for me to overcome my fear of cuticle nippers. 😉 I also believe that the most important thing for me personally is to properly remove any nail polish residues (especially around the nail bed) with the orange peel swab. You often don't see that there is some “skin” over the nail. If you "scrape" very lightly with the chopstick, you get it off and the varnish then stays on the nail better and longer.


0 Comments